This year, the party is all about Rapunzel. (If you haven't seen Tangled, do!)
I recently saw a wood door hanger used as a chore chart- moving a clothes pin (with the chore written on it) to the oher side of the door hanger when the chore has been completed. I thought that was a cute idea, but at 5 (almost 6) my daughter doesn't have enough chores for that.
When November 1st came, her teacher hung a cupcake up in the classroom representing Reese's birthday. When I told her it was still weeks away, she said "So my birthday is in four days?" That's when I decided I NEEDED to make some type of countdown to her birthday so I wasn't asked every day, "How many more days now?"
That's when I decided on a Birthday Coutdown Door Hanger (Rapunzel style, of course!).
What You'll Need:
Wooden Door Hanger
Clothes Pins
Paint
Yellow Yarn
Hot Glue
Here's How:
1. First, I painted the door hanger- Rapunzel Purple. (When it was dry, I sprayed glitter on it as well, to give it that princess touch.)
2. I added stars to my clothes pins to write the date on them. I used the mini clothes pins because I was adding so many to my door hanger. If you are doing something different, using the bigger pins might be better for little fingers. (The small pins tend to break easily.)
3. I braided yellow yarn to make Rapunzel's hair coming out of the 'tower' (Through the door knob hole.)
Attached my clothes pins and wha-la!
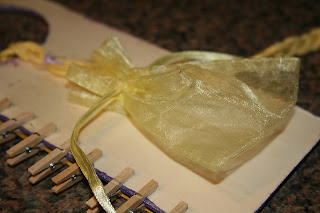
(I also hot glued a little bag on the back for the clothes pins when they get removed.....)
How will anyone know to come to a Rapunzel party without a Rapunzel Birthday Invitation???.....
What You'll Need:
5 1/2 by 5 1/2 white envelopes
Purple paper
Gray Paper
Black Paper
Vellum Paper
Yellow Yarn
Spray Glitter
Glue
Here's How:
1. Cut your purple paper for the background of the invitation. (Mine were 5 1/4 x 5 1/4) I then sprayed the paper with spray glitter. (It's cheaper to do it this way than buy the already glittered paper.)
Then start cutting towers. (This was free-handed, cut out, and then traced onto the gray paper)
2. Next came the braiding. I cut yellow yarn to the length I wanted the braid to be and braided 9 pieces of yarn together to get a nice, thick braid.
3. I attached the yarn with hot glue to the back side of the tower (through the window) and then hot glued the tower onto the invitation. I covered the back of the window with a piece of black paper.
(I did change the tower a bit because when I cut the original ones out, they were too 'boxey'.)
4. I printed my invitation wording onto vellum paper in a Walt Disney font. And attached it to the invitation with ribbon thread through holes I punched.
And Wha-La!


Those invitations are awesome!! You really need to link this one up :)
ReplyDelete