Pages

Tuesday, August 28, 2012

Strawberry Pie

{Read that title again, in your most Southern twang accent...
Strawberry Paaaa. There, that's better!}

I've often heard people refer to things in the 'simple times'. Well, rarely do I feel like things around here are simple. Except last night when I made this Strawberry Paa.


Start with a basic graham cracker crust. Mine was store bought. Think simple times.

Prepare a pound of strawberries by removing the stem and slicing them.

Bring to a boil: 1 cup sugar, 3 Tablespoons corn starch and 1 cup of water.

When it comes to a boil and thickens slightly, add a small box of strawberry jello.
Whisk it well.
Yum.
{It smells soooo good at this point.}

Place all your pretty and cut strawberries into your pie crust.

 Pour the hot strawberry goodness right over those pretty strawberries.

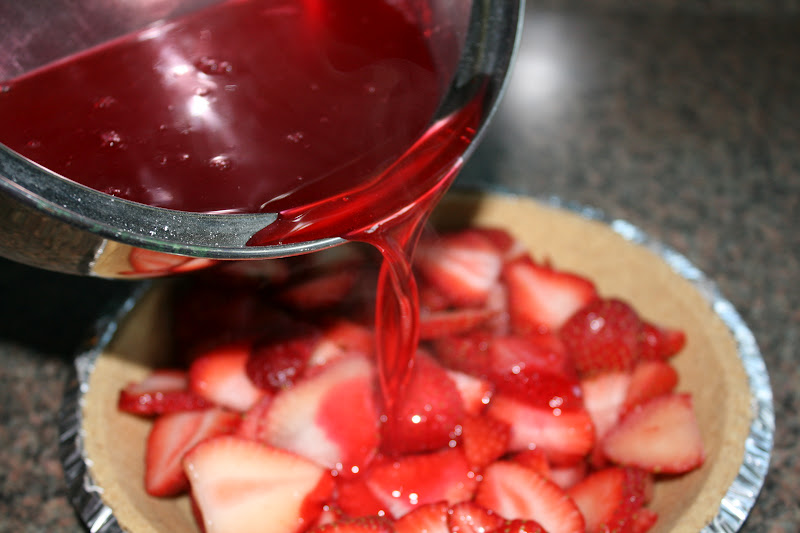
It'll look like this...

Now transfer to the refrigerator. My suggestion is to put your strawberry filled crust on a cookie sheet BEFORE pouring the hot liquid into it.
Can't you just see hot red liquid flying across your kitchen floor as you try to put a full, flimsy pie plate in the refrigerator? Yeah, me too.

Chill for at least 4 hours. Then grab a slice....

A little dollop of whipped cream is not optional. It is a must.

The pretty little dollop was for the picture. So, to keep it real, this is how it actually looked when I served myself a piece....

Someone else also prefers whipped cream over almost any dessert. Please ignore the fact that he left the strawberry pie (the whole reason for this post) on his plate after the whipped cream was gone.
Not sure where he got his taste buds. He's anti-bread and anti-mashed potatoes!
Can you believe it?? Me either! (Says the Queen of Carbs.)

Enjoy your Paa, Y'all!!!


Wednesday, August 22, 2012

Sprinkle Cookies

Every time I see sprinkles, I think of the time my husband ordered me a 
"donut with sparkles". 
The girl in the donut shop was confused and needless to say, we all had a good laugh.
In his defense, the donut stop was right after we got drinks and I had him order me a 
grande, iced, Tazo tea, passion, lemonade, sweetened. 
And yes, he struggled through that one too!


So, call them Sprinkles or Sparkles...
Either way, your appetite with sparkle for these sprinkles!


Here's What You'll Need:
1 box of vanilla cake mix, 18.25 oz.
1 tsp. baking powder
2 eggs
1/2 cup vegetable oil
1/2 tsp vanilla extract
1 bottle of sparkles sprinkles :)

Here's How:
Preheat the oven to 350*. Combine the cake mix and powder together in a large bowl. In a separate bowl, mix the eggs, oil and vanilla. Add the wet ingredients to the dry ingredients and stir to combine. Stir in the sprinkles and drop by spoonfuls onto a baking sheet. Bake for 10 minutes. Allow them to cool for a few minutes on the cookie sheet before you transfer them to a cooling rack.


See all the fun sprinkles sparkling?

Stack them anyway you'd like....

Just don't forget to eat them...

Down to the...

last...

bite!


I found these yummy cookies HERE!

Tuesday, August 21, 2012

Teacher Survival Kit


Every teacher needs a survival kit to start the year off right!
(And I might be a little too excited to have an excuse to use all these cute teacher gifts I keep coming across!)


Teacher Survival Kit


Here's what I put in mine.....

(Not pictured is a Starbucks gift card. Go HERE to see how I 'wrap' those!)


And here's why....


Animal cookies for when your classroom seems like a zoo. 
Band-Aids for when things get a little rough.
Chewing Gum to help you stick to it.
Crayons to color your day bright and cheerful.
A candle for when you are up late grading papers.
Erasers to remind you everyone makes mistakes.
Lifesavers for when you've had one of those days.
Marbles to replace the ones you've lost.
A
Mounds Bar for the mounds of confidence you give your students.
Paperclips to hold it all together.
Pencils to "write your wrongs."
Hand Sanitizer to keep everyone healthy and happy.
A rubber band to remind you to be flexible.
A shiny Penny to remind you that each student will shine in his or her own special way.
Starbursts to give you a "burst" of energy when you need it.
Tissues to wipe away the tears...yours and theirs.
A toothpick to help you "pick" out the good qualities in others and yourself, and a little something extra to help you get back to the daily GRIND!


Find a cute bag or box to load all the school year necessities into....


And finish with tissue (in a bright apple red)!

Happy Giving!

I am a First Grader....


The sign says it all on this early Monday morning! 
Backpack and lunch packed... ready to go!


He looks excited in this picture because he has no idea that Reese is staying at school 
and he is not. 
(I didn't capture the tears that followed leaving Reese at school but, there were many.)


In her seat and ready to learn!


Reese!
We LOVE you so much! And we're so excited to see all that you will learn this year in first grade.
We miss you while you're at school but can't wait to hear about your day!
Love,
Daddy, Mommy and Graham


{Psst... Cute 'I'm a First Grader' sign, right??? Print yours here. All grades included!}

Tuesday, August 14, 2012

Birthday Balloon Wreath

We recently celebrated a very special Little Boy's third birthday!
(More of Graham's 3rd Birthday coming soon! Plus, his 1st and 2nd too!)

To kick off the pre-birthday decorations, I made a birthday balloon.
I decided to keep the balloon colors gender neutral so I can use them for any birthday!


Here's What You'll Need:

A straw wreath (I bought a 14 inch wreath)
Balloons (I used about 300)
Floral pins (You'll need the same number of pins and balloons)
Ribbon for hanging


Here's How:
 One at a time, pin each balloon on the wreath using the floral pins folded like this...


Be sure to push the floral pins in as far as you can.
Pin the balloons close together for a full wreath. 
(I didn't want to see any of the straw wreath behind my balloons.)

And then keep pinning and pinning balloons!!! 
Turn on the Food Network, or HGTV, or your other favorite channel and the time will pass quickly! 


When I got to the top of the wreath, I hung the wreath on the ribbon and pinned the ribbon to the wreath using floral pins.


Ta-Da! How cute and festive, right?? I'm in love with my balloon wreath.
I can't wait until the next birthday to use it again!


This adorable idea can be found in tons of places!

This is the wreath that inspired me....
(via)


If you are hanging your balloon wreath on a glass door, I suggest covering the wreath with ribbon.
Did you notice the 'Thank You' for guests to see as they leave? Love it!
(via)


Having a balloon party? Make centerpieces too!
(via)

Monday, August 13, 2012

Overnight Blueberry French Toast


We LOVE breakfast! 
It is so convenient to have something already put together, in the refrigerator, that is ready for the oven!

(I actually served this for dinner. We like breakfast at any time! Instead of it being refrigerated 'overnight', I made it in the morning and it was ready for the oven at 5 pm.)

Overnight Blueberry French Toast


What You'll Need:
Toast:
12 slices French bread, cut into cubes
4 oz. cream cheese, cut in cubes
1 cup fresh blueberries
12 large eggs
1/3 cup real maple syrup
2 cups milk
Syrup:
1 cup sugar
1 cup water
2 Tablespoons cornstarch
1 cup fresh blueberries
1 Tablespoon butter


Here's How:
1. Place 1/2 of the cubed bread into a 9 x 13 baking dish.
Sprinkle cream cheese cubes and blueberries over bread cubes and then top with the remaining bread.

2. Mix together eggs, milk, and syrup. Pour mixture over bread cubes.
Cover with foil and refrigerate overnight.

3. Bake covered at 350* for 30 minutes. Remove the foil and bake for another 30 minutes or until fluffy and golden. Serve with blueberry sauce.

4. Blueberry Sauce: Cook water, sugar, and cornstarch until thickened. Stir in blueberries and simmer for 10 minutes. Add the butter and stir until melted.


I adapted this recipe slightly from Six Sisters Stuff!