Pages

Friday, March 30, 2012

Tres Leches Cupcakes


Some of my favorite recipes are not found on Pinterest.

GASP!!!!

I know, I know, hard to believe.

But, Pinterest cannot deliver the satisfaction of tasting the yumminess you see!
And a Church function (that ladies have slaved hours in their kitchen to make the best possible dessert) now that is where you can see and SAMPLE. (My kind of recipe shopping.)

Enter, Tres Leches Cupcakes.
(And you're welcome!!!!)

This ultra moist, yummy cake is usually a whole cake, but I just love anything cupcake!
I saw, loved, tasted, loved and then asked for the recipe. (Just so I can share with you!)

Tres Leches Cupcakes
(Adapted slightly from here)

What You'll Need:
Cake:
6 large eggs, separated
1/4 tsp. baking soda
1/4 tsp. salt
1 cup sugar
1/2 cup butter, melted and cooled
1 cup flour, sifted
3/4 cup evaporated milk
1/2 cup whipping cream
3/4 cup sweetened condensed milk

Topping:
1 1/2 cups whipping cream
 3 Tb. sugar
Cinnamon

Here's How:
1. Preheat oven to 325*. Line muffin pans
2. With an electric mixer, beat egg whites, baking soda, and salt on medium until soft peaks form.
3. Reduce speed and add egg yolks and sugar. Mix until smooth. Fold in melted butter and then fold in the flour in 3 or 4 batches.
4. Pour batter into prepared pans, filling them 1/2 way.
Bake for 25 minutes.
5. Meanwhile, combine the 3 milks.
6. When the cupcakes are cooked and still warm, poke (a dozen) holes in them using a bamboo skewer.


7. Pour the milk mixture over the cupcakes, a tablespoon at a time until all the milk mixture is used.
8. Remove the cupcakes from the pans and cool completely.
9. Whip the remaining whipping cream and sugar until stiff peaks form.
10. Pipe or spoon onto cupcakes and sprinkle with cinnamon.

Sé que usted les gustarán estos pastelitos tanto como yo!

Tuesday, March 27, 2012

Chocolate Chip Cheesecake Cookies

Yum. The perfect combo: Cheesecake and warm Chocolate Chip cookies.
Don't worry, this recipe makes a ton, so you'll have enough to share.


 Chocolate Chip Cheesecake Cookies
(found here

What You'll Need:
2 cups flour
1/2 tsp. salt
1/2 tsp. baking powder
1/8 tsp. baking soda
10 Tbs. margarine (softened)
1 cup sugar
1 egg
3 oz. cream cheese (softened)
1 tsp. vanilla
1 1/2 cups semi sweet chocolate chips


Here's How:
1. Preheat the oven to 375*
2. Combine dry ingredients (flour, salt, baking powder, and baking soda) and set aside.
3. With a mixer, blend butter, sugar, egg, cream cheese and vanilla.
4. Slowly add dry ingredients, mixing as you go.
5. Stir in chocolate chips. Drop by spoonfuls and bake 10-12 minutes. (Just until edges slightly brown.)

If you're a 'big girl', grab some coffee and if you're a 'dipper', like me, grab some milk and enjoy!!!!

Wednesday, March 21, 2012

Why Don't I Post Every Day?

Why doen't this Mommy blog every day?
(key word Mommy)

As I sat to blog the other day, Graham (my 2-year-old, energentic, little boy) started to try to pick me up off the chair.
"Stuck!" he cried.
"Yes, Mommy is stuck right now."
"Mommy, stuck!" he had such a sad face.
"Do you need me to help you do something?"
"Yes!'
"What do you want?" I asked, as I got up. He took my hand and led me to the couch.
"Me, you!" He said as he pointed to the couch.
"You want me to sit with you?"
"Yes!" He was so excited. I sat on the couch and he climbed up in my lap and covered us with a blanket. And there we sat. Just sitting and cuddling, watching TV for the next 30 minutes.


Wasted time? Definietly NOT. Do you think he'll always ask me to cuddle with him on the couch? I doubt it, so I'm not going to ever turn down the opportunity to have special time with my kids when they ask.
So, that is why when I sit down to blog, sometimes I just don't get finished....

Tuesday, March 20, 2012

Bye-Bye Play Room

Bye-bye play room, HELLO sanity!

For most of the Play Room's existence.....

it has looked something like this...


and rarely, after a frustrated Mommy finally cleans it, you could find it like this....

(I love the vacuum streaks!)

And then what seems like 2 minutes later...
(Look at her, sitting there, looking so innocent!!!!)

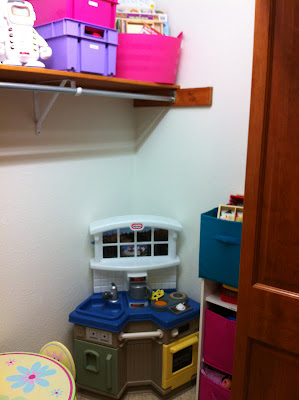
So my brilliant plan (and so far, it HAS been brilliant) was to 'tone down' the toys and therefore eliminating the constant mess.
I decided to forgo my extra storage space in the upstairs hall closet in hopes that it would hold toys and be a mini play area.
'Cause what Mommy needs a big closet for junk when she has a basement? ;)
And what children need a room, bursting with toys, that they can't pick up?
(Besides, now Gramma and Papa have a place to stay!)

Before:

Nada. Zilch. Nothin' stayed in that closet!!!!
During:

Now:


And Mommy's favorite toy? The label maker!

And soon....
Ridiculous loooooooong shelf and hanging rack will be removed;
New shelves installed;
Re-organizing (cause I just can't do it enough).

Dear Dad,
When you're visiting this week, would you mind installing some shelves. I know we talked about doing a pantry... but, I was thinking, while you're in the mode maybe you could do another closet???
Love,
Daughter
P.S. Free haircut and dinners in return! 
XOXO

Thursday, March 15, 2012

Bed Swap Part 2

Reese's Room Before:

Bookcase made specially for her by my Dad.
We needed something for her books and I got this idea from Pottery Barn Kids. I e-mailed my Dad the picture and if you ask me, this dollhouse bookcase is better than ANY Pottery Barn one!

They brought it from Virginia for her 3rd birthday. It was bigger than she was!!


And now....

New bed and bedding...
(I know, I know... Iron the cover Lindsey!!! I was just too excited to get it on the bed!)


The 'Bookcase' that previously held books, is now taken over by Fisher Prices'  "My Loving Family" doll house accessories.


Temporary bookcase till I find something better....
I read somewhere that kids need a 'junk drawer' to keep their odds and ends. The top basket is hers to put her junk. Things that come in the house that you don't have 'a spot' for.
It has worked nicely for us!
(Bouncy ball, pictures, notes from friends, music Cd's, etc)

The bottom basket (and a shelf in her closet) hold her books for now.

Still keeping the 'Beach' theme..


And oh the stuffed animals!!!!
Believe it, or not, she just got rid of 15 of them before this picture!
(I have a cute Pinterest idea for these guys. Coming soon to a blog near you!)

Tuesday, March 13, 2012

Bed Swap- Part 1

When needing a guest bed in our guest bedroom, we decided to purchase a smaller bed for Reese. (We needed, the currently occupied, queen sized bed that she was using).

She may have been down-sized, but she definitely 'up-graded'.
(Queen bed we moved to the guest bedroom.)

 
It was a lot of bed for such a little girl to make...


Used mostly for sleeping...

and reading....

and packing for Gramma's....

and, occasionally, the stuffed animal choir...

and, OF COURSE, birthday breakfast in bed!!!!


We found the perfect bed for her. We decided against a bunk bed and went with a day bed with a trundle.
She was so excited when I told her it would, kind of, be like a couch. I said she could prop pillows up and sit on it to read and play. 
To which she responded, "And I can get a T.V.????"

Haha, nice try.


I'll show the finished room tomorrow! :)

Friday, March 9, 2012

Joel's Birthday Peppered Chicken

Here is the promised "Happy Birthday to Joel" chicken recipe...

Joel's Birthday Peppered Chicken
source: Joel asking for 'Chicken with pepper' for his birthday and me wanting to try to cook a whole chicken for the first time....

What You'll Need:
1 Whole Chicken
1 Lemon
1 Onion
3 Whole Cloves of Garlic
1 Tbsp. Salt
1/2 Tbsp. Ground White Pepper
1/4 Tbsp. Ground Black Pepper
Freshly Crushed Black Peppercorns
2 Tbsp. Vegetable Oil

Here's How:
1. Rinse your chicken, inside and out. By doing this, you'll remove the 'innerds' without having to fish your hand around in the hind region of the bird. (At this point, I'm thinking I will continue to buy already-made rotisserie chicken from now on and singing 'Happy Birthday To You...' as I go for motivation.)

2. Pat your chicken DRY. When I say dry, I mean dry. If it's not dry, you won't get that yummy crust you know you're craving.

3. Cut up the onion, lemon and smash the garlic cloves a little. Then stuff them in. Don't worry, it'll all fit. You can't hurt the chicken...

4. Mix your peppers, salt and oil in a small bowl.
5. Pour over the chicken and start the rub down. Getting all the places.....

(I cut a little slit for the wing tips to go into. That way, they didn't burn while cooking.)

6. Place the coated, stuffed chicken into a 9x13 baking dish.
7. Bake at 450* for an hour and 15 minutes. Let the chicken rest for 25 minutes after cooking to allow juices to rest and stay absorbed into the meat.

Slice, serve, enjoy.
The salty, peppered, crunchy crust is worth the whole hand-in-raw-chicken-thing after all!!!!!!

Double Chocolate Chip Frappuccino Cupcakes

Here is the promised "Happy Birthday to Joel" cupcake recipe...


Starbucks Double Chocolate Chip Frappuccino Cupcakes
source: adapted slightly from Kimz Kitchen

Cake:
1 Box Devil's Food Cake Mix
1 (5.9 oz.) Instant Chocolate Pudding Box Mix
1 Cup Sour Cream
1 Cup Vegetable Oil
4 Eggs
1/2 Cup Warm Water
2 Cups Semi Sweet Chocolate Chips

Preheat oven to 350*.
1. Mix cake, pudding, sour cream, oil, eggs and water. Stir in chocolate chips.
2. Divide among 24 greased, cupcake liners.
3. Turn the oven down to 325* and bake 18-23 minutes or until done. Cool completely.

Chocolate Mousse:
7 Tbsp. Sugar
3 Egg Yolks
1/4 Cup plus 3 tsp. Water
1/2 pkg. Semi Sweet Chocolate Chips
1 1/4 Cups Chilled Whipping Cream

1. Whisk sugar and yolks in a large metal bowl. Place the bowl over a pot of simmering water.
Continually whisk until liquid reaches 160*, about 8 minutes.

2. Meanwhile, place chocolate chips in a medium bowl.
3. When egg mixture has reached the desired temperature, pour it over the chocolate chips. Let this sit and melt for a few minutes. Then beat egg and chocolate mixture until cool and thick, about 5 minutes.

4. Beat the whipping cream in a separate bowl until stiff peaks form.

5. Fold whipped cream into chocolate.
6. Refrigerate until ready to use. (I put mine in a big resealable plastic bag, ready to pipe.)

Swiss Meringue Butter Cream Icing:
3/4 Cup Sugar
4 Egg Whites
1/4 Tbsp. Salt
2 Sticks, Unsalted Butter (at room temperature)
1 Tbsp. Vanilla

1. Mix sugar, egg whites and salt in a heat proof mixing bowl. (I used the same metal mixing bowl, washed, of course.) You know the drill... place the bowl over a pot of simmering water. Whisk until mixture reaches 160* and sugar is dissolved.
2. Return the mixing bowl to your mixer. Start beating on low speed and gradually increase to medium-high speed until stiff glossy peaks form. (Approximately 10 minutes.)

3. Reduce the speed to medium and add the butter, a few pieces at a time.
4. Add vanilla.
5. Switch to the paddle attachment and beat until are bubbles are gone. (Just a minute or two.)

To Assemble the Cupcakes:
-You will need the Cupcakes, Chocolate Mousse, Butter Cream Icing, and a jar of Hot Fudge.

1. Once the Cupcakes are completely cooled, core out the center.
I tried a knife but found that my melon baller worked great without tearing the cupcakes.

2. Spoon a small dollop of hot fudge (at room temperature, no need to heat it) into the bottom of the cupcake hole.

3. Pipe the Chocolate Mousse onto the top of the hot fudge sauce.

4. Pipe the Butter Cream Icing onto each cupcake. (I used a large star tip)

5. Pipe hot fudge sauce on top and finish with a Starbucks signature green straw.

This was by far, the most time-consuming cupcake I think I've made in my 29 years.
(For some of you reading this, that probably is not saying much....)
HOWEVER,
great was the reward.
Moist, chocolaty cake, fluffy mousse, creamy, dreamy icing.
Yes. I did that and they were awesome.
Just sayin'...