Pages

Tuesday, December 4, 2012

It's The Most Wonderful Time Of The Year!


It's beginning to look (and sound, and smell).....


A LOT like Christmas!!!!

(Mommy's cute, little elves were a big help in the tree decorating department this year!)

Happy to say we are all decorated, most of the Christmas shopping is done and I have a long list of Christmas cookies waiting to be baked!!

It's the most wonderful time of the year!


Monday, December 3, 2012

Blessings Mix


Happy Thanksgiving!
(I know,  I'm over a week late but I didn't want to go without saying it!)
I hope your Thanksgiving was filled with Family, Food and Gratefulness! 
We have been blessed with so much!


These fun treats called 'Blessings Mix' are what Reese handed out to her classmates and to family on Thanksgiving Day.
Such a cute idea and Carmel Potatoes has a printable over here!

These Blessings Mix were easy to put together for a fun Thanksgiving treat. All the ingredients were found at the grocery store and the tags were easy to print and cut out. They were the perfect size for snack size baggies. 
(Tuck this idea away for next years Thanksgiving get-together!)

Thursday, November 1, 2012

A Thankful November

Happy November!
(Yeah, I can't believe it either!)

I remember this time last year, having all of these great things to do for the Holidays. And then I remember thinking after Christmas, "I just didn't do all the things I wanted to do."
Don't get me wrong, we jam packed our Holidays with family, baking, decorating, crafting and more but I wanted to do more one-on-one with my kids.
Don't worry, I've already got a list of things to help my kids do, rather than mommy doing herself!

I love how knowing the Holidays are approaching makes me sit back and
'see what the Lord has done!'
He has blessed beyond what I deserve.
One of the things I want to do with my children.... giving thanks, the 'old-fashioned way'. Giving a hand-written Thank You!

I read a post written by a friend over at the Clutch and it has truly inspired me....


She wrote...

November is a month of thankfulness, and what better way to show that than committing to write one note per day for the month to people that you are thankful for? 

Friends, family, neighbors, coworkers, service people ... get the wheels churning, grab a notecard and pen, buy some stamps, and let's get to expressing our gratefulness. What a surprise it will be for those 30 people you choose who only go to their mailbox to see bills and catalogs ... your note will definitely be a bright spot in their day (and quite possibly their month!). 


Because today is already November 1st, and more than likely, you do not own a stamp, think IN your house for the first day of Thank You's! There's already a note under my Hubby's pillow for him to find tonight. And I also wrote one for my daughter's lunch box for school tomorrow.
(Then a trip to the post office!!!!)


I hope you will be join me by showing extra Thanks this month! What a neat opportunity we have to show thanksgiving by just taking a second to write a note.
Who is on your list to Thank?

Tuesday, October 30, 2012

DIY: Ruffled Bedskirt

"I CAN SEW! I CAN SEW! I CAN SEW!"

I felt like shouting it from the roof top when I finished my first huge sewing project. 
But really, I don't know much about sewing. I DO know how to sew a straight hem and I came up with an easy way to 'ruffle'. That's a start, right? 


When I made a base for my bed to raise the mattress (read about that HERE), my bedskirt was suddenly too short for my liking. (That is pictured HERE). I fell in love with all the "ruffly" things I'd been seeing on the internet. And as usual, my project is about 4 months late in the DIY world. But, I finished it, and I love it!

My inspiration was this throw I saw on Pinterest.
(via)
When I originally read the instructions from diydesign, I decided to make mine a little different.


Here's what you'll need:

1 Flat King sized sheet
3-4 Spools of thread
An existing Queen sized bedskirt


And, of course, a sewing machine. 
(Mine was given to me as a wedding gift over 8 years ago!)


And here's how:

It's important to measure several times and cut once. Otherwise, you'll be heading to the store for a second sheet!

This flat sheet was 108 inches x 102 inches.
I wanted to have 4 tiered ruffles on each side of the bed skirt (12 ruffles total).
I also knew the ruffles needed to be 6 inches hemmed so I could over lap the ruffles and have a 19 inch long bedskirt.

The strips for the ruffles were cut about 8 inches each. And they were kept the original 108 inches long from the sheet I bought. I was able to keep the original hem of the sheet on the ends of my strips.

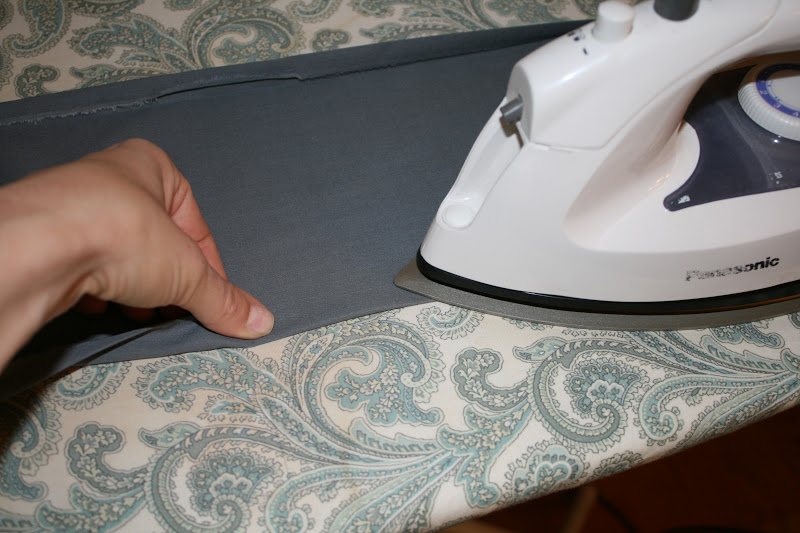
To hem the two rough sides of each strip, I folded the end a 1/2 inch over and ironed.


Then I folded the ironed 1/2 inch over again and ironed.

Checking as I went to make sure my strips all measured 6 inches.

Then on to sewing the hem!


This is where my method takes a less scientific route. My mother-in-law showed me the 'right way' to ruffle something. 
And then I knew why she thought I was crazy to make 12 ruffles for a bedskirt. 
If I did the ruffles the 'right way', I would never be posting this completed DIY bedskirt!!!

So, enter the 'Lindsey Way'. 
(The 'let's get this over within this month method'.)

I started with the very top ruffle and laid it on the current bedskirt. (Yes, I took over my entire living room floor.)
I 'dispersed' the 108 inch strip evenly over the current 80 inch bedskirt and pinned the ruffle on the bedskirt.


To the sewing machine!
Here's where it gets technical. (wink, wink.)
I pinched, folded, and sewed as I went across each ruffle strip.


Let me insert a little ruffle note here:
I did not want these ruffles to look like a little girl's room should. I was going for minimal ruffles. And because I was having 4 tiers of ruffles on top of each other, I knew this amount of ruffle would be enough!


I repeated the 'Lindsey Way' of ruffling 3 more times to finish one side of the bedskirt.
After placing the top ruffle along the seam of the original bedskirt, the second ruffle was placed 4 1/2 inches below the original seam, the third ruffle was placed 9 inches below the original seam and the fourth was placed 13 inches below the original seam.

Then, it's on to the other long side and finally, I did the foot of the bedskirt last.
I did not need the ruffles for the foot of the bed to be as long as the sides. I ended up cutting 23 inches off, making the strip on the foot of the bed 84 inches.
(Here's the math for that:
108 inch strip - 23 inches cut off - 1 inch for a new hem on one side = 84 inch strip)


And after a long weekend of cutting, folding, ironing, folding, ironing, hemming, pinning, sewing....

WHA-LA!!!!!
A DIY 4 tiered ruffled bedskirt!


Saturday, October 27, 2012

Coming In May....

Today, I am officially in my second trimester of Baby #3!!!

Boy or Girl??
We shall see...
In May of Twenty-Thirteen!


To celebrate, here's what I'm going to do today:
1. Go through my 2 tubs of maternity clothes.
2. Think to myself, "What were you thinking when you wore that 4 years ago?"
3. Order new maternity clothes on-line.
4. And finally, share with you our 'secret' pictures we took awhile back....

The day we told Reese and Graham our BIG news!


We starting by taking our annual family pictures.....


Then we gave the kids 'little gifts for taking good pictures'...

The gifts were books that were entitled 'I'm a Big Brother' and 'I'm a Big Sister'.

Reese didn't catch on.

For the next 4 or so minutes I was trying to ask Reese leading questions like:
"When Graham was born, what did you become?"
To which she answered, "A big sister!"
"Right, so we got Graham a Big Brother book, what does that make Graham?"
Confused, her reply was, "A little brother?"

It took awhile. We were all laughing so hard.

I finally had to come out and say, "Mommy has a baby in her belly!"
This next picture captured her response, "Are you sure?"


"Yes, Reese. I'm sure!!!!"
(And Graham had no idea what we were talking about but, as you can see, he had a good laugh too!)


BOY or GIRL????

Graham's Vote: BOY
Reese's Vote: GIRL


I have a feeling that they'll be excited either way!!!


And this last picture is my favorite!
(We made Announcement Postcards with this picture and sent 
them to family to share our news!)


I am so looking forward to those little cries, baby smells, tiny clothes, and adding a special bundle to my already precious family!


Thank you Lord, for entrusting us with Reese and Graham. I feel honored to be adding another member to our family. My desire is for my Children to grow up and see You in me!

Friday, October 19, 2012

S'mores Cake Bars


Gooey, Yummy, Easy.

S'Mores Cake!


I was asked to write a guest post, earlier this week, for a sweet friend! What a better fall recipe than an indoor s'mores?

Visit This Hungry Mama Bakes to check out my post on S'Mores Cake Bars and tons of other recipes Tammy has posted!
Your tummy will be glad you did! :)

Monday, October 15, 2012

Nana's Pumpkin Cookies- Guest Post!

Two known facts about my In-law's:
1. My Father-in-law makes the BEST chili.
2. My Mother-in-law makes the BEST pumpkin cookies.


The perfect fall combo, don't ya think?

Fall would not be complete without Nana's Pumpkin cookies.
Church potlucks are not complete without Nana's Pumpkin Cookies.
I can't remember the last time I made a version of pumpkin cookies, simply because I knew I'd be disappointed that they weren't Nana's Pumpkin Cookies.

I LOVE them. My kids LOVE them. I LOVE them. (Oh wait, did I already say that?)

YOU.WILL.LOVE.THEM.


Seriously though, you are not completely enjoying fall until you taste these little pumpkin drops of Heaven. 
Funny thing is... I always thought they were a 'Super Secret Family Recipe'. Good for the world that they are not!!! 

Thank you Nana for sharing your recipe here!


The Story of The Pumpkin Cookies...
I found this cookie recipe out of a cookbook that I received from my bridal shower over 33 years ago.  It originally called for raisins but I added chocolate chips instead and it has been a big hit whenever I take them anywhere :)

The cookies can be frozen. I line each layer with wax paper in ziplock containers. Ready to go whenever you need them :)! And I alway double this recipe because one is never enough:)!!


Pumpkin Cookies
1 cup sugar
1 cup pumpkin
1/2 cup shortening 
Mix together.

2 cups flour
1 teaspoon baking powder
1 teaspoon baking soda
1 teaspoon cinnamon
1/4 teaspoon salt 
Stir together in a separate bowl and then add to pumpkin mixture. 

Stir in 1 cup milk chocolate chips. 

Drop dough by teaspoonfuls onto ungreased cookie sheet. 
Bake until light brown, 8-10 mins in preheated oven at 375 degrees. 

Remove from pan and cool. 
Spread with Glaze.


Glaze:
1/4 cup butter
2 cups powdered sugar
1 teaspoon real vanilla
1-2 Tablespoons milk
Melt butter then add powdered sugar, vanilla and milk. Stir until smooth. (For a double recipe I usually add another Tablespoon butter and another 1/2 cup powdered sugar to stretch the glaze a bit more) 

I put on the glaze just enough to cover the cookie; it's plenty!

ENJOY!!!!! :)

Robin