There are those moments in your life that fill you with gratitude, love, and thanksgiving beyond what our measly human words can describe.
A few of those moments for me are:
-Accepting Christ as my personal Savior
-Marrying my best friend
-Having my precious babies
Now, those moments above are huge, life changing events.
Sometimes those moments may not be life changing but heart touching in an
indescribable way.
We experienced one of those heart touching moments last night, as a family.
Reese has been making a special effort to keep her room clean. (By herself, without me asking- which is kind of unheard of for the little girl that collects things and hides them in all corners of her room.) Graham has picked up on her cleanliness efforts and cleaned his room yesterday too. (A two-year old boy people!) He actually put everything away in the RIGHT place. It's one thing to pick up your toys and shove them in places so you can go outside to play. It's a whole other (great) thing to pick up those toys and put them in the right place. And not just in the right place, because it is the right place, but so that you can find it the next time you want to play with it!
All that to say, I wanted to reward them somehow.... with something they wouldn't forget.
As they were getting ready for bed last night, all kinds of questions were asked in trying to guess the 'surprise'.
"Is it a toy you bought?" No, it's not a toy.
"Is it dress up fairy wings?" No, you can't wear it.
When it was time to get in bed, I had Graham go get his pillow and blankie.
(and pacie... gulp. He's down to the last one folks and yes he is about to turn 3 :/ )
When he came back into Reese's room, I pulled out her trundle bed and asked it they'd like to have a slumber party.
SHHHREEAAAAKKKKKSS! (I'm sure the neighbors heard)
Daddy got the iPad and set it up so they could lay in bed together and watch Handy Manny in bed.
(My kids don't have t.v.'s in their rooms, nor do they usually stay up that late.)
As they laid, tucked in, watching the show, that's when it started....
The uncontrollable giggles from a 2-year-old boy who has never had this fun experience before.
It. Was. CONTAGIOUS.
Reese started giggling. Mommy started giggling. Daddy started giggling. Graham giggled even harder.
Mommy starting crying.
Thank You Lord for my family. Thank you for (what we think are) the tough times.
Thank You Lord for the great times.
Thank You Lord for the childish giggles.
Thank You Lord for those moments that put the cherry on top of being a Mommy.
Thursday, July 19, 2012
BBQ Lovin'
We had a busy couple of days this past weekend.
One event we WEREN'T going to miss was a
BBQ Couples Shower for my hubby's co-worker.
The soon-to-be sisters of the co-worker did a great job at planning and pulling off the event.
Can I see professional party planning in their future? Yep. And here's why....
(I'd love to have that Corn, Cheese & Tomato Salad and the Taffy Apple Salad recipes... hint hint)
My favorite part was the S'mores Bar.... I'm not a bar person, but this kind of bar I could definitely visit often. I might have had one too many.
(Or two too many..... okay, really, three too many. And when I say too many, that's on top of the normal two every person is allowed before people think you are a BBQ skewer stealer.)
The gift idea...
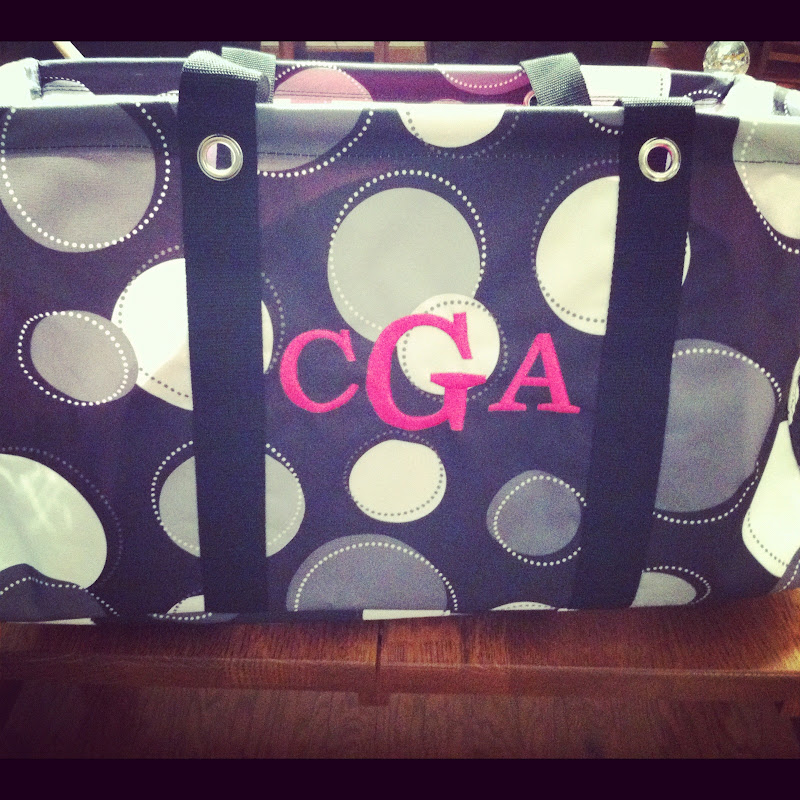
The soon-to-be sisters approached me with a cute bag (below)
with the bride-to-be's soon-to-be initials.
"Can you fill it for us?" They asked.
Well, what couple wouldn't want a bag of beach goodies?
It was perfect because this couple happens to be beaching it after the I Do's.
HIS: Manly colored beach towel, black flip flops, sport sunscreen, aloe and a very manly magazine.
HERS: Girly beach towel, silver flip flops, tanning oil, a DIY magazine and a HOT pink floppy beach hat (not pictured).
Stacy has more great pictures and BBQ lovin' over HERE.
(And where she collected all the great ideas!)
And I almost forgot the BEST BEST BEST idea for a couples shower.....
B-A-B-Y-S-I-T-T-E-R-S
We took our two kids and didn't see them much the whole time.
The Sisters got fun Jr. High girls to play with the little ones and keep them busy so the Mom's and Dad's could play couples games, eat in peace,
and cuddle by the fire pit making s'mores.
THANK YOU. It was kinda like a date ;)
(Did I miss the babysitter tip jar???? I felt like I needed to pay someone!) :)
One event we WEREN'T going to miss was a
BBQ Couples Shower for my hubby's co-worker.
The soon-to-be sisters of the co-worker did a great job at planning and pulling off the event.
Can I see professional party planning in their future? Yep. And here's why....
(I'd love to have that Corn, Cheese & Tomato Salad and the Taffy Apple Salad recipes... hint hint)
My favorite part was the S'mores Bar.... I'm not a bar person, but this kind of bar I could definitely visit often. I might have had one too many.
(Or two too many..... okay, really, three too many. And when I say too many, that's on top of the normal two every person is allowed before people think you are a BBQ skewer stealer.)
The gift idea...
The soon-to-be sisters approached me with a cute bag (below)
with the bride-to-be's soon-to-be initials.
"Can you fill it for us?" They asked.
Well, what couple wouldn't want a bag of beach goodies?
It was perfect because this couple happens to be beaching it after the I Do's.
HERS: Girly beach towel, silver flip flops, tanning oil, a DIY magazine and a HOT pink floppy beach hat (not pictured).
Stacy has more great pictures and BBQ lovin' over HERE.
(And where she collected all the great ideas!)
And I almost forgot the BEST BEST BEST idea for a couples shower.....
B-A-B-Y-S-I-T-T-E-R-S
We took our two kids and didn't see them much the whole time.
The Sisters got fun Jr. High girls to play with the little ones and keep them busy so the Mom's and Dad's could play couples games, eat in peace,
and cuddle by the fire pit making s'mores.
THANK YOU. It was kinda like a date ;)
(Did I miss the babysitter tip jar???? I felt like I needed to pay someone!) :)
Wednesday, July 11, 2012
My Little Secret...
I have a little secret. And it's under my sink.....
For years I have carried a handled organizing tub around from bathroom to bathroom to clean. It was filled with a ton of cleaning products, most of which, I didn't even use.
Then I smartened up and decided to put one small basket in each bathroom, under the sink, and eliminate products that aren't necessary.
No more carrying that tub of cleaning stuff up and down the stairs.
Not to mention the toilet brush! (Enter BIG yucky face here.)
In each basket, in each bathroom:
- A roll of Paper Towels
- Glass Cleaner
- Tub Cleaner
- Toilet Bowl Cleaner
- Disinfecting Wipes
(Upstairs Bathroom)
(Guest Bathroom)
And beside each basket, under each sink, is a toilet brush!
Why on earth has it not occurred to me to do this years ago???? (I have no idea.)
I DO know that it's a lot easier cleaning my bathrooms now!!!
Happy Scrubbing!
For years I have carried a handled organizing tub around from bathroom to bathroom to clean. It was filled with a ton of cleaning products, most of which, I didn't even use.
Then I smartened up and decided to put one small basket in each bathroom, under the sink, and eliminate products that aren't necessary.
Small. Simple. Clean.
No more carrying that tub of cleaning stuff up and down the stairs.
Not to mention the toilet brush! (Enter BIG yucky face here.)
In each basket, in each bathroom:
- A roll of Paper Towels
- Glass Cleaner
- Tub Cleaner
- Toilet Bowl Cleaner
- Disinfecting Wipes
(My Bathroom)
(Guest Bathroom)
And beside each basket, under each sink, is a toilet brush!
Why on earth has it not occurred to me to do this years ago???? (I have no idea.)
I DO know that it's a lot easier cleaning my bathrooms now!!!
Happy Scrubbing!
Labels:
Cleaning,
Organization
Wednesday, July 4, 2012
Proud To Be An American!
Happy Birthday America!
We hope your Independence Day is filled with family, celebrations
and thankfulness for freedom!
Friday, June 29, 2012
School Supply 'Cake'
There are several ways to create a 'School Supply Cake' if you were to search how-to's.
Here is my version.
Short and Sweet.
I think pictures tell it better than paragraphs of words.

{I'm not giving an exact list of 'What You'll Need' like I usually do. The supplies will vary with the size of cake you are aiming for and your own creative touches!}
I started with a round, silver charger as my base. (You could also use an actual cake base).
The center of the cake is a (1/2 gone) roll of paper towels and 4 one subject notebooks.
Space out the notebooks around the paper towel roll and secure with rubber bands.
My idea with the rubber bands, was that after this cake serves as a center piece, it could be taken apart and its' contents used.
I surrounded the bottom with packs of crayons and attached with rubber bands.
Then I topped the crayons with bottles of glue. Again, more rubber bands. :)
To give it a little more, I put glue sticks in between each box of crayons.
You want everything to be tight so it doesn't shift.
Then the cake topper.....
I had these cute little boxes leftover from Halloween.
They originally had a monster on top and candy inside.
I hardly ever keep things 'just in case' one day I might need it. But, in this instance, I'm glad I did!
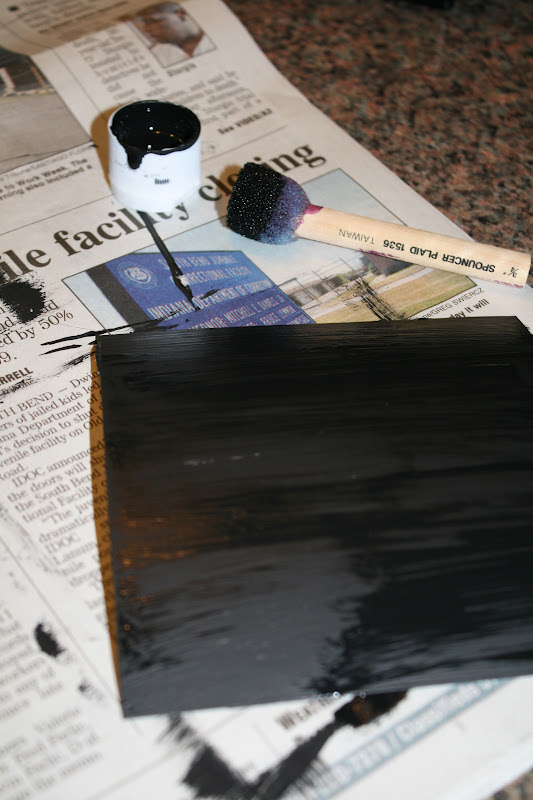
I cut a thick card stock square, bigger than the top of the box and painted it all black.
Can you guess where I'm going with this???
I didn't want the cake topper box to appear empty so I decided to cover the window with crayons.
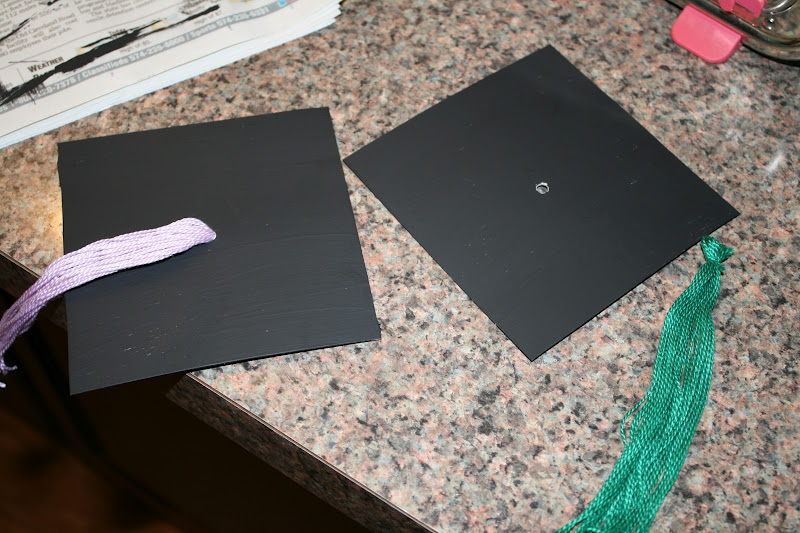
Every good graduation decoration needs a tassel, or two.
I made these out of yarn I had on hand.
A hole in the top of the 'hat' was a perfect fit for these tassels.
Wha-la! Cake Toppers Graduation Hats!
I finished the cake with ribbon to cover the rubber bands.
And here is the finished cake displayed on the beverage table of
Click HERE for the adorable and FREE Teacher Subway Art printable!
Tuesday, June 26, 2012
Home Again!
In the words of my Dad after a vacation...
"Home Again, Home Again, Giggity, Gig, Gig."
"Where did you go?" You might ask...
"Where did we NOT go?" Is my response.
We left late one Wednesday evening from our Humble Abode and traveled about 2 hours away to get a head start on our long journey.
Our pit-stop for the night was in Indianapolis, IN.
Thursday, we got up bright and early and started for Virginia. Our usual 12 hour trip will now only take 10 hours since we stayed the night in a hotel the night before. (We were actually REALLY excited about the trip not being the whole 12 hours!)
We reached Virginia that evening just in time for my little brother's High School Graduation Open House.
We stayed in Virginia with my parents until Sunday. While we were there, we celebrated with my brother and family at his Graduation...
and the next day we visited a local zoo.
Sunday finally came. The great anticipated day!!!! Off to the BEACH!
We arrived at our rented beach condo Sunday evening in North Carolina. The 6 hour trip was well worth it as we stood on the deck and breathed that salty air!
We spent a glorious 6 nights and 7 days with sand in our toes. (And ate more than I should say... but it was too good to keep to myself so I WILL share soon!)
On the following Sunday, we parted ways with my parents and siblings and headed to another part of North Carolina so the Hubby could squeeze a little bit of business into a lot of vacation. Sunday night was spent in a hotel in Charlotte, NC.
Monday afternoon (after taking the kids to see Madagascar 3) we headed to visit Joel's sister and brother-in-law in Greenville, SC. We had a fun, relaxing time! It was fun to drive by our old apartment where we lived our first year of marriage. It still looks the same! :)
Wednesday we left Greenville and headed back to my parents in Virginia. Of course, we stopped at a favorite outlet mall and also made a stop to purchase local peaches. (Yummmmmm)
We visited my parents for a couple more days. Friday we packed up (what seemed like the bazillionth time) and headed to West Virginia for a family wedding. It was one of the most beautiful weddings I have attended. Of course, it helped that Joel and Reese were in the wedding party! ;)
I had one handsome Groomsman and one beautiful Flower Girl!
Sunday, we packed the car for the final leg of the trip. HOME! :)
(By this time, we were ready to sleep in our own beds and I was ready to get my clothes out of my closet rather than out of a suitcase!)
2,300 Miles
7 States
3 Hotels
0 Sunburns
1 Condo
3 Sand Castles
8 Gas Fills Ups
2 Lost Teeth
1 Incredible Date Night
18 Days away
2 Movies
1 Wedding
3 Shopping Trips
1 Fathers Day
7 Nights Filled with Card Games
1 Graduation
2 Birthdays
6 Haircuts
29 Restaurant Meals
1 Wedding Rehearsal and Dinner
8 Rearranging/Re-packing the Car
2 Tired (but happy) Parents
"Home Again, Home Again, Giggity, Gig, Gig."
"Where did you go?" You might ask...
"Where did we NOT go?" Is my response.
We left late one Wednesday evening from our Humble Abode and traveled about 2 hours away to get a head start on our long journey.
Our pit-stop for the night was in Indianapolis, IN.
Thursday, we got up bright and early and started for Virginia. Our usual 12 hour trip will now only take 10 hours since we stayed the night in a hotel the night before. (We were actually REALLY excited about the trip not being the whole 12 hours!)
We reached Virginia that evening just in time for my little brother's High School Graduation Open House.
We stayed in Virginia with my parents until Sunday. While we were there, we celebrated with my brother and family at his Graduation...
and the next day we visited a local zoo.
Sunday finally came. The great anticipated day!!!! Off to the BEACH!
We arrived at our rented beach condo Sunday evening in North Carolina. The 6 hour trip was well worth it as we stood on the deck and breathed that salty air!
We spent a glorious 6 nights and 7 days with sand in our toes. (And ate more than I should say... but it was too good to keep to myself so I WILL share soon!)
On the following Sunday, we parted ways with my parents and siblings and headed to another part of North Carolina so the Hubby could squeeze a little bit of business into a lot of vacation. Sunday night was spent in a hotel in Charlotte, NC.
Monday afternoon (after taking the kids to see Madagascar 3) we headed to visit Joel's sister and brother-in-law in Greenville, SC. We had a fun, relaxing time! It was fun to drive by our old apartment where we lived our first year of marriage. It still looks the same! :)
Wednesday we left Greenville and headed back to my parents in Virginia. Of course, we stopped at a favorite outlet mall and also made a stop to purchase local peaches. (Yummmmmm)
We visited my parents for a couple more days. Friday we packed up (what seemed like the bazillionth time) and headed to West Virginia for a family wedding. It was one of the most beautiful weddings I have attended. Of course, it helped that Joel and Reese were in the wedding party! ;)
I had one handsome Groomsman and one beautiful Flower Girl!
Sunday, we packed the car for the final leg of the trip. HOME! :)
(By this time, we were ready to sleep in our own beds and I was ready to get my clothes out of my closet rather than out of a suitcase!)
2,300 Miles
7 States
3 Hotels
0 Sunburns
1 Condo
3 Sand Castles
8 Gas Fills Ups
2 Lost Teeth
1 Incredible Date Night
18 Days away
2 Movies
1 Wedding
3 Shopping Trips
1 Fathers Day
7 Nights Filled with Card Games
1 Graduation
2 Birthdays
6 Haircuts
29 Restaurant Meals
1 Wedding Rehearsal and Dinner
8 Rearranging/Re-packing the Car
2 Tired (but happy) Parents
Thursday, June 21, 2012
DIY Photo Frame
Remember the Graduation Frames I made for Reese's Kindergarten Graduation?
Well, here are my instructions of
a VERY easy and VERY cute DIY frame....
Pick up an unfinished wood frame, or two...
Stain the back sides of the wood frame....
Don't forget to get into the little holes in the back:
(The little holes hold the wood dowels that allow you to prop the frame up.
You will want to stain the wood dowels too!)
When the stain is dry, turn the frame over and apply Mod Podge to the front of the frame with a foam brush.
Place your choice of scrapbook paper to the front of the frame and smooth by rubbing the frame with a credit card.
This is when you can get really creative with the type of frame you make! Choose paper to match your home decor, baby paper, anniversary paper, sports paper, etc.
When it is dry, turn it over to reveal the back of the frame and the back of the paper. With a straight blade, cut off the excess paper away from the frame.
It'll end up looking like this....
And close up, you'll see raw edges....
Lightly sand the edges of the frame and the raw edges:
I then brushed a black ink pad on the frame to give it an aged look.
The frame on the left is un-inked, and the frame on the right is inked.
After inking the frames, apply 3 coats of Mod Podge. Allow each coat to dry completely before adding another!
Add a picture!!!!
(Hmmmm..... something is missing...)
A Graduation Hat to 'top' off a great Graduation Frame!
If you already have Mod Podge, paper and left-over stain to use, the cost of this project should be around $1 for the frame.
Easy, cute, AND affordable!!!
Happy Framing!
Labels:
DIY
Subscribe to:
Posts (Atom)