Pages

Monday, February 25, 2013

DIY Faux Roman Shade


I've read so many different ways to make your own faux roman shade.
(Faux meaning, it doesn't actually work as a shade; this one is staying put!)
The way I made mine was a compilation of several I have seen.

My laundry room window was the perfect opportunity to experiment in making one.
Here's the before......(sorry for the bad picture)
I bought a simple valance years ago when we first moved into our house. It was hung by a tension rod and pretty much forgotten about.
That is, until I found this fabric.... (LOVE at first sight!)

A little secret? It's actually a shower curtain. (I have a REALLY hard time finding fabric I love, that's good quality, and sold in local fabric stores. )
To make your own faux Roman shades, you'll also need tension rods (I used 4) and lining fabric (I used a white flat sheet).

I made my liner first. Measuring inside my window casing where my shade will hang.
The length of this will depend on how long you want your shade to be and the width will depend on your window.
The inside of my window measures 25 1/4 inches wide x 36 1/2 inches long so I made my curtain liner to be 25 1/4 inches wide x 22 inches long, finished. (I hemmed all 4 sides of the white liner.)


Next, I cut the fabric {ahem... the shower curtain} to be the same width but longer in length. After hemming the edges, the finished fabric rectangle measured 25 1/4 inches wide x 48 inches long.
I hemmed the bottom hem of the fabric wide enough to fit my last tension rod though to complete the folded look of a Roman shade.

I sewed the top of the liner and shade together so that they both hang from the same tension rod. (Just draped over the rod.)
I placed the other tension rods approximately where I thought I wanted the 'folds' in my Roman shade to be. (In front of the fabric.)
Don't stress over this part- I moved mine about 100 times to get the folds how I wanted them.


Starting with the top, empty rod, fold the fabric over to make the first fold...

Then repeat with the next one pulling your fabric from the bottom as to not mess up your first fold. (Continue this process until all of your folds are completed.)
After folding, my Roman shade measured 25 1/4 inches wide x 22 inches long.

Here, I moved the curtain to the side so you could see the tension rods. The lining fabric is hanging straight, and the tension rods that are holding the patterned fabric are in front of the lining fabric.
You will need one extension rod per fold.
This is where you can have a little fun! Making the folds close together, far apart, more, fewer, etc.

The ONLY thing I don't absolutely love about this Roman shade is the little part at the top of mine that I can see the tension rod. Like I said, this was an 'experiment'.
But, this project was much too easy to complain about! This faux Roman shade took me about an hour to make.
I'd call that a good nap-time project!


Friday, February 22, 2013

Chalk Paint


Well, I DID it! 
I fell for the (over priced) Anne Sloan Chalk Paint and bought a quart in Paris Grey. 
I also bought a sample in Pure White and Provence.

I may have also talked my sister-in-law into buying some. 
That way, I got to practice painting on her frame project before taking my paint home.
{hehe}

It sat on my basement steps for months.... honestly, I was a little scared to use it.
It could have been because it was so pricey.
It could have been because I was afraid I wouldn't LOVE it as much as everyone else.
It probably was because I was afraid I WOULD love it and have to fork out more mu-lah for all the other fun colors!!!! :)

Yes, I definitely love it.

My first project.....
Isn't it puuurrrty? (cough, cough)
This is my jewelry cabinet I've had for years. (And I still use it, I just hide it in my closet.)


I started out painting the creases with the Provence. And yes, you read that right...
I started out painting.
If you're unfamiliar with Anne Sloan Chalk Paint (also known as ASCP) you should know that there is NO prep. When I first heard that, the 38ish dollar sign was a little easier to swallow.


After the Provence dried, I painted the entire piece with the Paris Grey.

I experimented with my distressing methods after letting the grey dry.
First I tried lightly sanding to distress.
The second method I tried turned out to be the better option for me (for the look I was trying to achieve). I took a damp cloth and rubbed over the spots I wanted the teal (Provence) to show through. This way of distressing was dust free! It also allowed some of the original dark paint color to show though.
The tricky part is remembering where I painted the Provence since I didn't cover the cabinet in that color completely.

When all of the paint is dry, you will need to wax your piece. ASCP goes on easy but is very dull when it is dry. I purchased a clear wax from my local hardware store instead of buying the Anne Sloan Wax.
I used a clean, soft cloth and applied the wax evenly over the entire jewelry cabinet.
The wax will protect and it also gave the cabinet a finished look.


And it's back in the closet, but I'm not hating the color anymore!!!

Monday, February 18, 2013

Kid Valentines


I love the idea {especially for little ones} of NOT giving candy as part of a Valentine. 

I know, I know... what fun right? 
Well, if you saw the candy, cupcakes, brownies, and suckers my daughter brought home from her school Valentine party, I have a feeling you'd agree that non-candy Valentines can be just as fun!

Here are two we made this year...

For Graham, I fell in love with the idea of bouncy ball Valentines when I first spotted the ones Dandee made HERE.

What 3 year-old boy doesn't love bouncy balls? 

I started by printing the Valentine messages on card stock to be cut...

Then little {super excited} hands helped fill the small clear bags I already had on hand from a craft store.
We decided to include several ball accessories into the Valentines. We found small bouncy balls, ball stickers and assorted ball mini note pads in the party section at Wal-Mart.
All things 'ball' that my 3-year-old would love to receive!

I rounded the corners of the Valentine message before stapling them to the bag.

He was one proud little guy carrying this box of Valentines into his Wednesday night Church class to pass out to his friends!


Reese's school Valentines took a little more time.
Gone are the days of braiding three strands of embroidery floss and tying a knot at the end and calling it a bracelet.
Now, you need time, patience and one of these....

I'll admit, you can make some pretty neat bracelets with that machine, but since it was my first time, I decided to start with the least-complicated version. I kept it easy on myself and made all the bracelets the same, just changing the colors. That part, Reese gladly helped. :)

This was another idea from Dandee and I was able to print her Valentine Message for these adorable 'Knot' Valentines HERE.

After I printed them on card stock, I cut them out in circles and hole punched two holes in each to hold the bracelet.


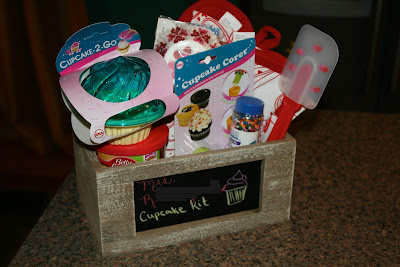
Reese's gift to her teacher was a 'Cupcake Box'. All the things, in one box, that she will need to make herself cupcakes! (Valentine oven mitts, hand towels, and spatula, a cupcake holder, a cupcake corer, cupcake liners and sprinkles. And of course, a box of cupcake mix and frosting!)

I found these super cute boxes with chalkboard windows. I think I'm going to go back for more! I keep finding things to use them for!


And for Reese's School Valentine party, we signed up for Rice Krispie treats. Her Daddy makes one killer Rice Krispie treat! ;)
(I threw him a curve ball when I suggested making them look like ice cream cones.)
They turned out adorable!

He put the Rice Krispie treat in a cake cone and then we melted chocolate for the top.
Topping it with a little love in the form of heart sprinkles.


Don't forget your lunch!!!!
(A heart-shaped PB&J sandwich, of course!)


Friday, February 15, 2013

Valentine's Day 2013

Our kids woke up on Valentine's Day to these....
Daddy and Mommy 'heart-attacked' their door in the night. Each heart has something we love about them.
I could have easily made 5,873 more hearts. There's just too much to love about my kids!


Other than the necessities, it's very rare that we buy our kids 'stuff' when we're out. (That's what grandparents are for, right?!?!?!?) So, when holidays come around, they get fun,
not-necessarily-needed treats from Mommy and Daddy.

This year's Valentine's included, shovels (for snow playing), cups, forks, spoons, candy, note pads, new shoes and their current favorite thing to play with, Playmobile.


Hand made notes for Daddy from the kids....
And I do mean hand-made. They painted their hands to form heart shapes!


A little love goes a long way....
So does a tooth pick and red nail polish!

Dinner was Peppered Chicken that I posted about {HERE}, served with a sweet pea risotto.
And OH MY! I forgot how good this chicken tastes! (This time, I added grated lemon peel to the pepper mixture to rub the outside of the chicken.)
It's been about a year since I made it, but I won't be waiting that long to make it again!

And for dessert....
Magic Mousse Jello (recipe found HERE) and Strawberry Brownies cut into hearts.

The Magic Mousse was easy and delicious. I even made mine sugar-free!
And the Strawberry Brownies couldn't have been easier either!

{Mix a box of strawberry cake mix with 2 eggs and 1/3 cup of oil. Spread it in a 9x13 pan and bake at *350 for about 15 minutes. Top warm brownies with a glaze by mixing 1 cup of powdered sugar and 1 1/2 Tablespoons of milk. Cool, cut and enjoy!}


Wednesday, February 13, 2013

30

Here's a math problem for ya...
2013 - 1983 = 30
Yep! That's me!!!
T-h-i-r-t-y..... and so far, it's not as bad as I thought! ;)


The celebrating technically started with a date night on Friday. When we got home, there was a strange man sitting on my couch. It took about 6 seconds for it to click that it was my DAD! And then I saw my MOM! They had spent the entire day driving to see me!
(I know the Grandkids are an extra bonus, but this trip was for ME!)
We stayed up late enjoying their company.
Saturday was a shopping day for the girls. I got to pick out a storage basket cabinet that my mom purchased for me as my birthday gift. While we gallivanted from store to store, the boys stayed back home and hung my new swing on our back screened-in porch before meeting us for dinner.
(My parents had to leave on Sunday but it was one of the BEST presents to have them visit!!!)


Oh warm weather come quickly!!!! I am dying to get out there and swing!


The celebrating lasted all weekend,
But here's a sneak peak into my (actual) birthday...

~ Was hand delivered a Tall, Decaf, White Chocolate Mocha with Whip (of course!) in the morning.

~ I lounged in my jammies most of the morning. (Okay, until 11:30 if we're getting technical.)

~ Showered and left to meet my best friend for lunch with our favorite son.

~ Took a shopping trip to Wally World. (I know what you're thinking... 'Who wants to grocery shop on their birthday? .... Well, not me, BUT I have a list of DIY's coming up and needed supplies, so technically, it wasn't grocery shopping!)
Sneak peek fabric...

~ Picked up my favorite daughter from school and headed home to cook dinner wait for the Hubs to come home and cook! Yep that's right! For my present, I asked HIM to make dinner for ME.
And it was one of my favs- breakfast for dinner. Finished off with homemade donuts (a recipe I'll share soon) and a Pandora charm to add to my little collection!

And BEST of all (drum-roll please.....), as Joel was doing the dishes after dinner he said, "Babe, thanks for making dinner every night. I just don't give you enough credit."
(Instant PERFECT birthday present!)


If I could go back 10 years and tell myself what I'd be doing when I turned thirty, I'm sure I wouldn't believe me!
I NEVER would have guessed that I'd be entering my third decade, in my third trimester, with my third child.


It's crazy the blessings I have received over the past 30 years!
I'm so thankful for all of the experiences, blessings and love received.
Bring on the next 30!
(If they're anything as good as the last, I absolutely can't wait!!!!!)

Wednesday, February 6, 2013

DIY {Duck Cloth} Wreath

I have seen a ton of DIY's on Burlap Rag Wreaths.
And I LOVE them.
Except, when going into my local fabric store.....
I found out that they don't have any fun colors of burlap in stock. (For example, pink!)
The next isle over, I spotted Duck Cloth- in lots of colors. And it was cheaper. Sold!


I started with a wire wreath form. This particular one was 12 inches.
(I was wanting a small wreath to hang on my sliding glass doors. I would recommend a larger one for a front door wreath!)

Then I started cutting my 1/2 yard of duck cloth in strips. It was way too neat. 
I love the rough edges that you see when using burlap. 
So, I cut little slits along one edge of the duck cloth and started ripping.

You end up with messy strings of duck cloth. Perfect!
These were too long so I cut each string into 1/3's.

Then Happy Tying!
Because, literally that's all you have to do!!!
Tie, tie, tie, tie some more..... tie till your fingers hurt. ;)


And you end up with a full, fun, frugal wreath!
{I only spent $2.75 on 1/2 of a yard of Fuchsia Duck Cloth and $2.49 on the wire wreath!}