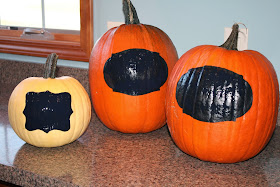
A super cute, super EASY way to give your home that extra special, personal touch....
Chalkboard Message Pumpkin.
Here's How:
1. Wash your pumpkin and let dry.
{I used dish soap and a wet paper towel. I did not submerge the pumpkin in water.}
2. Cut out a template the shape you want your message board to be.
{I found this label template HERE. After printing it and cutting it out, I taped it on my pumpkin.}
3. Trace around your template.
4. Paint with Chalkboard paint.
5. Do steps 1 through 4 as many times as you want!
6. When your chalkboard paint is dry, message away!
{'Boo!' was on our front porch for the Tricker-Treaters!}
{'Welcome' your guests in such a fun way!}
{'Give Thanks' is a perfect saying for the upcoming Thanksgiving Holiday!}
{Home Sweet Home} {We made one 'Get Well' Pumpkin to give as a gift.}
Here's a few tips:
- When changing your message, wipe lightly. If you rub hard, you run the risk of the chalkboard paint coming off.
- Pick out smooth pumpkins. The more the ridges, the harder it is to write on the chalkboard.
- If your pumpkins are staying indoors, be mindful of where you set them. If they are on a wood surface, I suggest placing something to protect your wood under the pumpkin.
- Read your chalkboard paint instructions on the length of time to allow your paint to dry before writing on it. I waited 24 hours.
- You can paint your message board without using a template.
{Although the traced template line made painting with chalkboard paint easy.}


