Pages

Wednesday, May 30, 2012

Fruit Smoothie

I hope everyone had a great Memorial Day weekend!
I know we did.... any weekend that Daddy gets to be home for 3 days in a row is a good one!

Here's how we started out the morning.....


Blend one yogurt cup, 2 cups of fruit and crushed ice (omit the ice if you are using frozen fruit.)

The perfect addition to a warm breakfast or a great summer time treat!

Monday, May 21, 2012

The Tooth Fairy Strikes Again...


Actually, it wasn't the Tooth Fairy's fault that the tooth (finally) fell out.
Reese has been bothered by her loose tooth for weeks now. Wondering and asking and even (dare, I say), obsessing about when this tooth would fall out!
I guess it didn't help that we kept saying things like,
"Chew carefully, you don't want to swallow it."
and
"I hope it stays in there till June or you'll be a toothless flower girl!"

Well, as usual, Mommy was right. I told her, "It'll fall out when it's ready!" And it did! Reese was getting comfy in bed a few nights ago. She was trying to pull her covers up, apparently that were stuck, and...  don't ask me how but, in the process of pulling the covers up, her knee flew up, bumped that barely-hangin-on tooth and out popped that baby pearly white. Thank goodness 'cause she was starting to not want to brush it because it was that loose. (gross)


That's when...
The Tooth Fairy Strikes Again!

She was sure to include in the letter, "Have fun picking out an outfit (for all 1,000 of your Build-A-Bear bears)!"


Dear Tooth Fairy,
Thank you for thinking of me!
Sincerely,
The Mommy Who Is Trying To Control The Stuffed Creature Population Around Here


Ahhhh... the day has come. My poor straggle tooth baby. She's still so adorable. It has been quite a hoot to see her do new tricks and re-learn certain things without that little tooth!
(I say little, but, my! What a big hole it has left!) ;)

Friday, May 18, 2012

(Another) Flower Power

This flower is beautiful. (And oh so easy).
And I have a beautiful sister-in-law that was a great model!

If you didn't think you could tackle the Flower Power from yesterday, I'm sure you can manage this one!


Here's How.....
You'll need to start with 6 cut circles- consecutive sizes.
DO NOT cut them perfect. It will be a waist of time. (You will see why in the next step.)


You want to know how I got the pattern for my circles? I grabbed 6 cups out of my cabinet. Seriously.
Then I used the cups to trace circles onto card stock. I cut the card stock circles out, put it on top of a stack of fabric and starting cutting.
Wha-la, circles.
:)

I'm not sure exactly what the fabric type is called. It feels silky, is shinier on one side and burns well.
Apparently, I missed the gene of fabric knowledge and sewing skills that runs so prominently in my family. :( Boo.


Once your circles are cut, burn the edges. Again, DO NOT be perfect. It adds so much when some petals are burnt a little more and not exactly the same.
This is when you need to keep in mind how big you want your circles. They will shrink a little when burnt.
Disclaimer: You are NOT setting the fabric on fire. It should simply just wilt as it gets close to the heat.


Layer and glue. (Hand stitching does well here too instead of glue.)

And you're done! Wait, what? Seriously???? Yes :)

Remember the gift I sent my mom for Mother's Day? She got a pretty flower on top.....

I attached a pin and added leaves to the back just like I showed you yesterday. I also finished the front with a small crystal gem in the center.


Sooo........
The EXACT same concept can be used to make a similar flower, but different and, I think, cuter. :)


See the difference? This one has more 'petals'.

Here's How....
Cut your same petals as the first flower shown on this post. Before you burn the edges, cut 4 slits around the circle. Like this:

Then, when you burn it (same technique) it turns out like this:

So cute, right????

What you make depends on the initial circle sizes you cut out.
{I cut much smaller circles for smaller flowers and bigger circles for a bigger flower.}

Make it a bobby pin.....

Or a ring.....

Don't forget the finishing touch of a jewel, gem, or button in the center!

Contrasting colors!!!!

The possibilities are endless people!!!!!
Happy Flower Power!

Thursday, May 17, 2012

Flower Power

Did you think the flowers from yesterday were adorable?
Me too. (Even after hooouuuurrrsss of making them, I still think they are cute!)

I thought I would share my 'Flower Power' secrets with you.
(OK, DIY flowers are not secrets at all- they are all over the internet and you see them everywhere!)
But, there is much power behind knowing how to make your own flowers.

Here's how I create one type of power....

You'll need 7 of the same size petals.
Mine were scallopped for this flower, but circles will do too!
Also, cut two more circles, just a bit smaller. (One circle will be saved for the finishing touches and is not pictured here.)

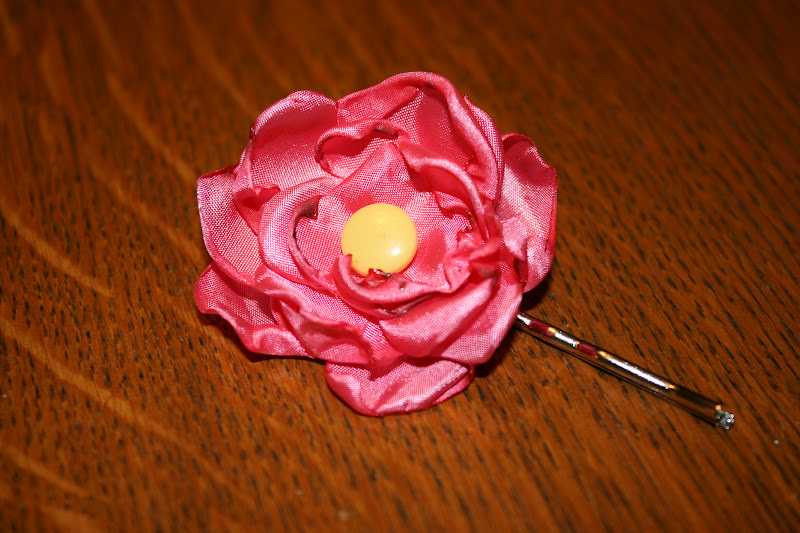
We'll start with the pink petals. Four of them to be exact.
Fold in half and hot glue.

Fold in half again and hot glue. (Repeat 3 more times.)

Your petals will look like this....

Did I mention you'll need a glue gun?
Enter: Your new best friend...

Cover 1/2 of one of your smaller petals with glue....

Place 2 of your pre-folded, pre-glued petals on; like this:

Repeat with the other 1/2 of your petals. Hold till dry.
(Dry time depends on your glue. Hot glue: 5 seconds. Fabric -or any other type of glue: 10 hours.)
Did I mention your Hot Glue Gun is your best friend???

Now, if you counted correctly, you should have 3 more petals left.
Take two of them and fold, glue, fold, glue, repeat..... (just like before)

Glue those 2 newly-folded, newly-glued petals into the center.

With that last, final petal: fold, glue, fold, glue and then do an additional fold and glue. That way, this petal turns out a little smaller than the others....

Plop that little guy right in the middle. This just adds that little bit of extra fullness. :)

You can stop there, although, I wouldn't advise it..... I have more cuteness in store....

You'll need to cut 4 leaves out- all of the same size. You will also need that extra circle you cut from the beginning of this tutorial.
Just so you know... the pink and teal petals are cut from felt. The green is fabric.

I glued the green leaves on top of the pink felt leaves for stability and dimention.

Glue the two petals together....

Then glue the petals to the flower....


The back doesn't look that great as is:
(Enter the other teal petal)

Gluing that on top of the bottom of the flower adds that finishing touch. Now, all you need to add is a hair clip or a pin!


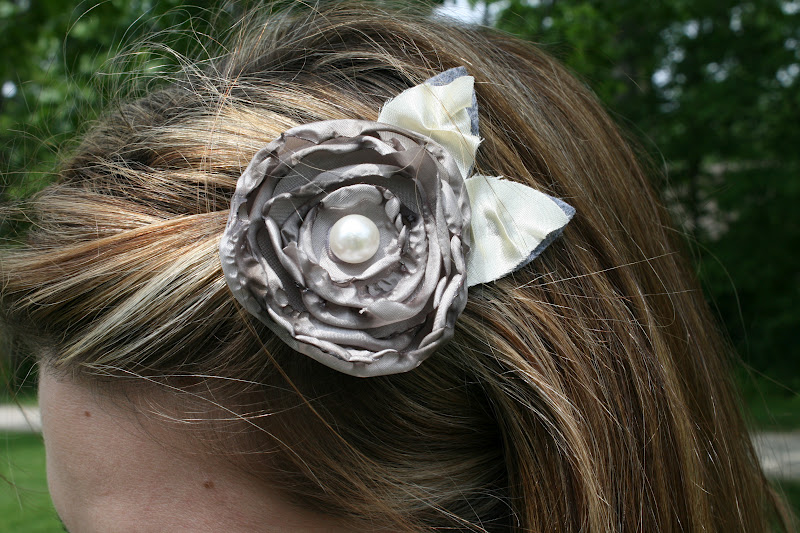
Here is another flower I made, the exact same way, only I used all fabric:


For this flower, I didn't add the 3 center, folded and glued petals.
I left it flat in the center and added a small felt circle to finish.


Don't forget to finish the backs of your flowers! (Using felt will help your flower maintain it's shape and add stability as it is worn.)
Make it even more fun and use contrasting and coordinating felt!

Easy enough, right????
Yes, it is. And yes, you can do it.
Try it, I dare ya!
Before you know it, you'll be a crazy flower making lady like me. Ha!


OK, two more great, easy ways to make flowers coming your way tomorrow!!!!!
(I'll try not to post this late! Yikes. Yawwwwwwnnnn.)

Wednesday, May 16, 2012

A Very Happy Mother's Day!

If you saw your Mom on Mother's Day, I hope you gave her a hug!
And if you don't live close to your mom, you should ALWAYS call her and say Happy Mother's Day.
An added dose of Mother's Day love, is the common Facebook status update or Tweet of something sweet about your Mom.
And if you have a blog..... You should devote a whole post to her! ;)


I love my Mom for bringing me into this world and loving me unconditionally.
I love my Mother-In-Law for accepting me into her family and loving me as her own daughter.
Both have shown me love, gentleness and the true meaning of MOM.


This is one of my favorite Mother's Day stories I received in an e-mail years ago...

The MOM Test
I was out walking my 4 year old daughter. She picked up something off of the ground and proceeded to put it in her mouth. I took the item away from her and told her that we don't put things in our mouths!

"Why?" my daughter asked.

"Because it's been on the ground. You don't know where it's been; it's dirty and full of germs." I replied.

At this point, my daughter was looking at me with total admiration and asked, "Mommy, how do you know all this stuff? You are so smart."

I was thinking quickly. "All moms know this stuff. It's on the Mom Test. You have to know it, or they don't let you be a Mom."

We walked along in silence for 2 to 3 minutes, but she was evidently pondering this new information.

"Oh, I get it!" She beamed. "So if you don't pass the Mom Test, you have to be the Dad."

"Exactly." I replied with a big smile on my face. 


These two put smiles on my face every day!


Although I feel like everyday is Mother's Day, it sure was fun to see the excitement in their eyes while 'treating Mommy special' with gifts and a special breakfast!

My husband treats me special everyday and has set a great example for our kids.
(Oh, and thanks Honey for giving me two beautiful children!)


I hope you enjoyed your Mother's Day as much as I did!


Mother's Day Weekend

Hello, My name is Lindsey. {I blog when I have time. :) }

I felt like I needed to introduce myself since it's been almost a week since I was last here. Yikes!
I don't really feel alone in my absence, almost all of the bloggers I follow have apparently been busy too! ;)


Mother's Day Weekend...
Reese and I spent the day before Mother's Day together at a Ladies Picnic.
(I was on the 'committee' so I got all the behind-the-scenes info!)

We were blessed with the perfect weather, great food and sweet fellowship!

We packaged the lunches in small, decorative gable boxes. The contents were devoured!
(Chicken salad croissant, ham salad sandwich, pinwheel wraps, grapes, individual veggie cups, and a bag of chips.)

Cupcakes were the perfect centerpiece (not to mention the perfect way to end a picnic!)


(I used my Cricut to cut our cupcake wrappers in all different colors. After wrapping the cupcakes, we put them in punch glasses and then into clear baggies.)
Cute way to display cupcakes, don't ya think???

Each lady in attendance received a hand crafted flower as their gift to take home.

They chose from a hair clip, a hair pin, a flower pin or a flower ring.

And if you come back tomorrow, I'll show you how to make your own!


My oldest and the very beautiful reason I am a Mommy...
Love me some Reeses-Pieces! :)